For your solar system to work, you must connect the solar panels, solar batteries and DC loads (if any) to the solar charge controller correctly. A wrong connection can permanently damage the whole system or a section of the system. You also need to know which one to connect first, and how to connect it. This article will walk you through with the step by step guide for connecting solar panels and battery bank to your charge controller.

What is the Work of a Charge Controller in Solar PV System?
The solar charge controller is a very important component of solar system. As the name implies, it coordinates the flow of electric charges from the solar panels to the battery bank. It prevents overcharging of batteries and over-voltage. The charge controller connects the solar panels, batteries and DC loads. Also, it coordinates the flow of charges from the solar panels into the batteries and DC loads (if any).
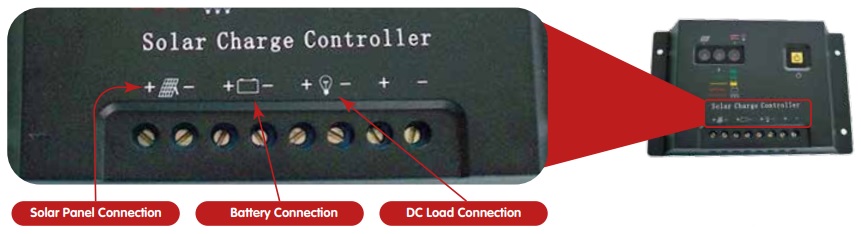
Each of these components (solar panels, batteries and DC loads) has its own connection (positive and negative) terminals on the solar charge controller. Most charge controllers have icons to indicating where each component is to be connected as shown below.
NOTE:
Never for any reason connect the solar panels directly to the batteries. Doing so will reduce the lifespan of the batteries and eventually damage them.
The maximum PV voltage and wattage for any charge controller (both MPPT and PWM) are always specified on the name plate of the charge controller as shown below. Make sure your solar panels’ effective voltage and total wattage don’t exceed these specified maximum values.

WARNING: Always connect your battery bank to your solar charge controller first, before connecting your solar panel cables. Doing it the other way round might damage your charge controller.
The 2 main types of solar charge controllers are MPPT and PWM charge controllers.
Difference between MPPT and PWM Charge Controllers
MPPT means Maximum Power Point Tracking. While PWM means Pulse Width Modulation.
MPPT charge controller optimizes the available solar energy from the solar arrays (panels). This type charge controller adjusts the charging current and voltage from the solar panels to a level that will optimally charge the battery banks any given point in time. As the intensity of the sun increases, the charge controller keeps adjusting the input voltage (from the panels), so that the solar energy from the solar arrays are properly utilized in charging the battery banks. The voltage at which PV modules can produce maximum is called Maximum Power Point or Peak Power Voltage.
On the other hand, a PWM charge controller maintains a particular charging voltage and current, regardless of the intensity of the sun at any given time. It does not properly utilize the available solar energy in the solar arrays when charging the battery banks, especially when the sun intensity is at its peak during the day.
So in general, MPPT charge controllers are more efficient than PWM charge controllers. Also note that they are costlier than PWM charge controllers. If you want an efficient solar system, then go for the MPPT type.
Check:
- Solution to All Solar PV Systems Installation Calculations
- How to Mount Solar Panels on Roof Tops & Standalone Structures
How to Connect Solar Batteries to Charge Controller – Step by Step
To reduce the risk of electric shock when connecting the solar battery bank to the charge controller, adhere to all safety precautions stated in the solar battery and charge controller manuals.
Below are the steps for connecting solar batteries to charge controller:
- First, connect a cable to the positive terminal of the battery. Connect another cable to the negative terminal of the battery. Make sure these two cables from the batteries don’t join together, to avoid creating a short circuit on the batteries.
- Use the right tool (usually a screw driver) to loosen the screws for the connection terminals (positive and negative) for the batteries as indicated on the body of the charge controller as shown below.

Battery connection terminals on a solar charge controller - Now connect the other end of the positive cable (from the positive battery terminal) to the positive terminal of the charge controller.
- Also connect the other end of the negative cable (from the negative battery terminal) to the negative terminal of the charge controller.
- Use the right tool (usually a screw driver) to secure the cables tightly on both terminals. Also ensure there are no naked wires.
Congrats! You have successfully connected your solar battery bank to your charge controller.
How to Connect Solar Panels to Charge Controller – Step by Step
To reduce the risk of electric shock when connecting the solar panels to the charge controller, shade the collectors (solar panels). You can use a board or anything that will not allow sunlight to reach the solar panels. This step is very important if you are making this installation during daytime. Also make sure that the positive and negative cables running from the solar panels do not join together, to avoid creating a short circuit on the solar panels (which might damage them).
Below are the steps for connecting solar panels to charge controller:
- Use the right tool (usually a screw driver) to loosen the screws for the solar panel connection terminals (positive and negative) as indicated on the body of the charge controller as shown below.
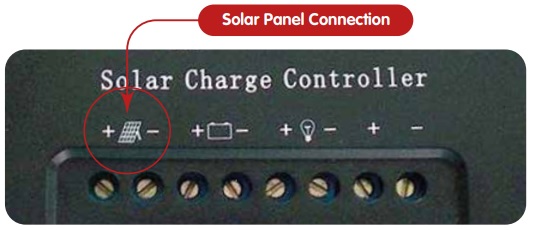
Solar panel connection terminals on a solar charge controller - Now connect the other end of the positive cable (from the solar panel) to the positive terminal of the charge controller.
- Also connect the other end of the negative cable (from the solar panel) to the negative terminal of the charge controller.
- Use the right tool (usually a screw driver) to secure the cables tightly on both terminals. Also ensure there are no naked wires.
Congrats! You have successfully connected your solar panels to your charge controller.
NOTE: As a basic colour coding, red is positive, while black is negative.
Below is a connection diagram for charge controller, solar panel and batteries.

PV Battery Installation Tips
Take note of these key tips when installing your batteries:
- Before commissioning the batteries, it is advisable that you give your battery bank a refresher charge. There are two ways you can do this. First option is to use a battery charger. The second option is to leave the solar panels to charge the batteries for at least 24 hours before you start using them.
- Always position your batteries where they can stand upright, away from movement obstruction, away from reach of children and also away from source of ignition.
- Also, avoid placing your batteries directly on concrete floor. This is for insulation and heating purposes. You can place the batteries on top of Styrofoam sheets or old blankets. You can also insulate the sides of the batteries, but make sure the top of the batteries are not insulated as this will cause improper venting on the batteries. Also, don’t place metal parts on top of batteries.
- If you are using flooded type of batteries like lead-acid batteries make sure the battery storage area is ventilated. Also avoid keep flooded battery types at height (like top of ward robe) as this affects the pressure in the battery.
- Make sure that the connected battery area is easily accessible for maintenance purposes.
- If you are using more than one battery, after connecting the batteries in series, parallel or mixed type (series-parallel), use a multi-meter to confirm the effective voltage of the battery bank. Then apply petroleum jelly around the terminals to protect them from moisture.
See:
- 3 Best Ways to Connect your Solar Batteries and Panels
- How to Choose the Best Solar Batteries & Panels for your System
Conclusion
You have learnt the step by step procedure for connecting solar panels and batteries to a solar charge controller, different types of charge controllers and their differences and key battery installation tips. Apply these guides in this article while installing your solar panels, batteries and charge controllers for your solar system.
Did you find any section of this article confusing? Ask your question in the comment section below. Don’t forget to subscribe to this blog via email to stay updated with our upcoming tutorial articles. Share this article with your social media friends by clicking a share button. Enjoy!