Google forms are real time savers. Some of your business’ daily routine can be taken care of by just using google form. You can use google forms to create and customize online survey, quiz, presentation, RSVP, job application, order, work request, event registration, worksheets, assessment and course evaluation. You can also use google form to create a contact form for your blog. Google form does not only help you create online forms, it also helps you to store, analyze and evaluate responses. You have various ways to handle responses. You will learn the basics of google forms, how to create and customize google forms for different business purposes. Also, you will learn how to track google form responses.

Getting Started with Google Forms and Features
Before you can use google forms, you must have a google account and also logged in. With the recent upgrade made by google on their forms, you can now easily design customize any category of online form to your taste. You can also integrate it to existing spreadsheets for data analysis.
See:
- A Concise Review of Google Forms vs Microsoft Online Forms’
- 15 Ways to Boost your Business with Facebook, Instagram & LinkedIn
Building You Own Google Forms
Simply navigate to docs.google.com/forms to start creating a google form. You will see different templates for various categories of online forms from the template gallery. If you want to create a form from existing templates, just click on the template and start editing. You can also create a form from scratch by clicking the Blank icon on the page as shown in the screenshot below.

The google form editor is very is to understand and use. Most of the actions you perform are clicking and typing. You don’t need even a basic knowledge of html or any coding language.
Once you click a template or the blank form option, you can start adding questions, restrictions, answers (for quizzes), header colour, background colour, text style, etc. By default, you will find 2 tabs; the Questions tab and the Responses tab. Focus on the Questions tab for now.
You will see the default Form title and descriptions. You can edit them to suit your own purpose. Click an existing form field to start editing it, typing questions and adding options. Use the drop down box next to the field to change the field type (multiple choice, short answer, paragraph, etc.)
You will find various settings and options in the google forms editor. In the top right hand corner, you will find the Customize template, preview, settings, send and more buttons. Use the floating toolbar on the right to add more questions, quickly add fields like images, videos, sections, add title and descriptions.
Google Form Fields Types
There are 12 field types in google form; 9 field types for question, plus texts, images and videos. To add a new field to the form, first click the plus icon in the floating toolbar (located on the right hand side) and then select a suiting field type as shown below.

Under each form field, you will find icons that allow you duplicate fields, delete, make them a required filed so that that the form cannot be submitted if a user leaves it blank. To add another option to en existing field, click on the last option (eg. option 1) and press the Enter key on the keyboard.
Short Answers: If the field is expected to hold a small number of text, then this field type is adequate. You can use it to collect email address, names, age, etc.
You can restrict the type or form of data the field will hold by adding validation to it. To Add validation, click the 3 dot icon located at the bottom of the particular field and select Response validation. You can also add a little description to help users understand what type of data is required using by selecting the description option as shown below.

Paragraph: This field type is very similar to Small answer field. It is usually used on fields where a higher number of texts are required from the user. For example, if your form will contain a field like “Tell us more about yourself”, then the paragraph field type is most suitable.
Multiple Choice: This is the default field type in google forms. The field type allows you give the users many options from which they can choose one. You can use it in fields like Gender where the user needs to select only one.
Checkboxes: This field type is very similar to multiple choice. But it allows the user to select more than one option from a field. You can use it in fields like Sources of income. Here, a user might have more than 1 source of income.
Drop-down: It is very similar to multiple choice. The only difference is that the user need to click a drop down arrow in order to see the options to choose. Only 1 option can be chosen also.
Linear scale: If you want to add a field where you want users to rate your business in a particular scale, like 5 star, then this field is suitable. You can also add label to the least and highest point rating as shown below.

Multiple-choice Grid: This field allows you add more than one question and a set of options serving all the questions. The questions are added as rows while the options are added as columns. If you want ask your users the different categories of your companies’ services they enjoy or hate, then this field is most suitable. You can also make each row required if you wish as shown below.

Date: If you want ask your customers the day they want to speak with your customer care of your company, then use the date field type. Note that the date format google will use depends on the location from which you set up the form. You can easily change your location by changing your language from http://myaccount.google.com/language.
In US date format, month comes before day, while for UK format, day comes before month.
Time: If you equally want to ask your customers the exact time they want your customer care representative to call them, then create a field using the time field type. They can select a particular hour, minute and optionally, second.
File upload: Do you want to request images or video from your users? then create a form field and set the type to field type. The multimedia files will be saved in your google drive. The default total file size google forms accept is 1 GB, but you can increase it. You can specify the file types, maximum number of files and file size as shown below.

You need to add a description to help users know the acceptable file size they can upload.
Check:
- 5 Best Ways to Protect your Computer from Virus & Hackers
- Top 5 Online Trusted Credit Card Processing Companies for your Business
Adding Sections to Google Forms
I know you must have come across online forms that have multiple sections or pages. Yes, most times, they are sectioned to make the form look nice and well arranged. Imagine having to fill a form with about 50 fields all at a stretch. Scrolling along the whole field can even scare you or discourage you.
Google form editor also allows you section your forms or surveys. When a user finishes with section one, you provide the user with a link to section 2.
By default, google forms have only one section, To add a new section, click the last icon in the floating toolbar located at the right hand side of the form window.
Note that forms with sections need to link to each other logically. For example, when a user finishes with section 1, the user should see a link to section 2, and so on. Then on the last section, the user should see a submit button.
So when you add a new section, make sure you set the right logic that will properly connect it to both the previous section and the next section as shown below.

See: 7 Best International Online Banks for Entrepreneurs
Customizing an Existing Form Template
If you want to design a google form from an existing template, there might still be need to change some default settings like header image, theme colour, background colour, font style, etc.
Once you have chosen the template and it fully loads, click on the customize template icon located at the upper right hand corner of the form editor window. This opens the Theme options as shown below. Make appropriate changes like changing the header image, background colour, etc.

Creating Online Quiz with Google Forms
Another interesting thing about google forms is that you can create an online quiz from scratch and also turn any kind of online form into a quiz.
There is a blank quiz template which has all the quiz settings. Once you click on this template, you can start creating your quiz.
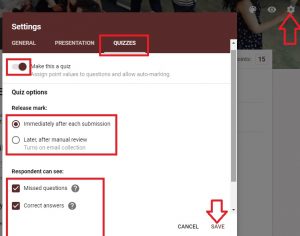
But if you want to edit a registration form or any other form and use it as quiz, then click on the Settings icon located in the top right hand corner and then switch to the Quizzes tab (the 3rd tab). Turn on the Make this a Quiz mode. This mode will allow you assign point point values to questions and allow auto-marking.
Under the Quiz options, Check the Release mark immediately after submission if you wish or select the other option to that manually.
You can also set it so that respondents will see the questions the failed, the correct answer and the point score of question as shown below. Don’t forget to save the settings.
If you don’t want any respondent to answer the quiz more than once, then go the General tab and check the Limit to 1 response. This means, the respondent must sign in to their google account before they can fill the form. You can further set it so that the users can not edit their answers once the submit the quiz by unchecking the Edit after submit option as shown below.

Once you have saved these settings, you will see the Answer key button added to each field in the quiz. Click this button to specify the right answer for each question. The button also allows you to allocate points to each questions. You will see the total point at the upper right hand corner of the quiz form. Click the Add Answer Feedback to tell reader why they failed a question and how the correct answer came about if you wish.

How Get your Form URL and Share it to Respondents
Once you have created a google form, the next thing is to give your respondents the form URL so that they can fill in the required data and submit it. You have multiple ways to share the form to your respondents: by email, getting the URL, embedding it to your web page, sharing it on social media like facebook, twitter etc.
To Get Your Form URL:
Click on the Send button located in the upper right hand side toolbar.
Now click the Share via URL link. You will see the google form’s full URL as shown below.
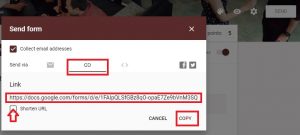
Check the Shorten URL button the see the shortened form of the link. Click on Copy to copy the link to clipboard.
Check:
- 5 Best Ways to Appreciate your Employees as an Entrepreneur
- 7 Best SMS Marketing Software Tools for Small Businesses
Viewing and Tracking Google Form Responses
Once you have created your form, you can easily manage and track the form responses from the Responses tab. Once a respondent fills the form and clicks the submit button, the details are automatically recorded in this tab.
The response tab has 3 sub-tabs: Summary, Question and Individual. The Summary tab gives you graphical representation of all the result statistics. If you want to check a particular respondent’s data, go to the Individual tab. If you want to check for a particular form field or question then go to the Question tab.
![]()
How to Stop Collecting Form Responses
Forms, especially for registration purposes have duration, after which a respondent cannot be allowed to fill and submit their data. To stop collecting responses for your form: Go to the Responses tab and turn off the Accepting Responses as shown above.
Downloading Google Form Responses
Note: You can download google form responses as “.csv” files. To do that, simply go to the Responses tab. Click on the 3 dot icon at the right hand corner of the page. Select Download Responses (.csv).

You can also print all responses or delete all responses.
Creating Spreadsheet for Google Form Responses Destination
You can create a spreadsheet that records responses from your form. The files updates whenever a respondent submits a form.
To create a spreadsheet for this:
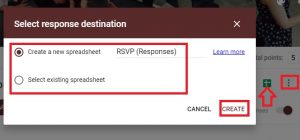
Click on the green Spreadsheet icon beside the 3 dot icon in the Responses tab. You have 2 options here; to create a new spreadsheet or to select an existing spreadsheet. Then click on Create.
See:
- 5 Basic Office Software Tools for Managers, Data Analysts & Accountants
- 5 Best Genuine Websites to Work & Make Money Online From Home
Conclusion
You have now learnt how to create, edit, share URL, manage responses of google forms. You also learnt how to use google form to create different kinds of online forms, quiz, presentation, etc.
Do you have any question on this tutorial? Comment it below. Don’t forget to subscribe to our blog via email to get updated once we publish new business and tutorial articles. Help your friends on social media to learn how to use google forms for their businesses by clicking a share button.
There are more advanced tips you can learn about google forms which were not covered in this tutorial guide. An article on Zapier covered part of it.